After my mom started referring to herself as fictional gray-haired legends like Cruella De Vil and Sweeney Todd on a regular basis, it was time to intervene. I had just passed the seven-week mark of isolating at home in the suburbs, and with salons in our state remaining closed for at least the next few weeks, my mom and I decided to take matters into our own hands and address the situation that was her gray roots. I tried the “Kim, there are people that are dying” and the “Come on, Mom, everyone attending Zoom yoga knows it’s what’s inside that counts” approach countless times, but there was no getting out of this one.
Of course, I was terrified that I would color her hair too dark or accidentally get some dye on her skin, but Madison Reed’s Permanent Color Kit ($27) made the process incredibly doable and, dare I say, fun!?
Before I get into the breakdown of dyeing my mom’s hair at home, it’s important to share that when doing this, it didn’t take long for us to both realize this wasn’t entirely about aesthetics. It was about the fact that during a global pandemic when literally nothing is typical about our everyday routines, being able to look and feel like our usual selves could help make it all feel a little less broken. How my mom trusted me with something so vital to her appearance and self-confidence, I’ll never quite understand, but after reminding me repeatedly that “it truly can’t get worse,” I was ready to do the damn thing.
Step 1: Pick Out the Right Hair Color
After hearing great things about Madison Reed’s at-home products and doing plenty of our own research, we placed an order for the color. To ensure picking the perfect shade and solution, we went through a series of questions on the website to find the right match. The questions asked about her hair texture, her skin tone, her natural base, how often she colors her hair, if she’s had trouble covering her grays in the past, and so much more. Of the 41 permanent hair-color shades, she was matched with a medium golden brown shade.
Maybe it was the praise the product received from fellow mahjong-playing suburban moms over group text or the in-depth questionnaire ensuring the perfect color selection, but we were both confident that when the product arrived at our doorstep, any and all Cruella mentions would be a thing of the past.
Step 2: Prepare the Dye, and Section the Hair
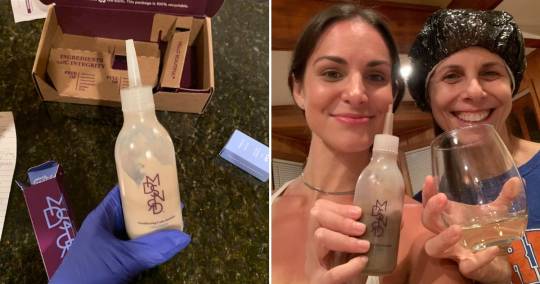
The package came within a week, and because Netflix definitely needed the evening off, we decided there was no better time to do it than on a Saturday night. While I intently read the instructions, took out the included materials, and prepared the dye, my mom had the important task of readying the liquid courage that was going to get us through this daunting task, aka pouring the wine.
The kit came with a cap, one pair of gloves, barrier cream to protect the skin, a cleansing wipe for any mishaps, color-enhancing shampoo and conditioner to wash with after coloring, and, of course, the radiant cream color and the conditioning color activator in a bottle for easy application. My mom applied the barrier cream to her forehead and on the tops of her ears to prevent dye accidentally getting on her skin. I added the cream color to the bottle of color activator and shook it up like a maraca. It was go time.
Step 3: Take On the Gray
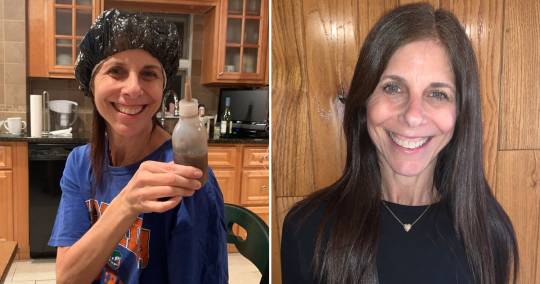
After some deep breaths and a calming Drake playlist, the dye was mixed and ready to do the deed. I split my mom’s hair into four sections with clips and applied the dye. The precise tip of the bottle made it incredibly easy to add the desired amount of color onto her part and roots. She then put on the cap for 40 minutes to let the dye sink in. After the time passed and we clinked our glasses, it was time to take off the cap and apply the remainder of the color. Using the bottle and the gloves, I massaged the dye down to the middle of her hair and tried to make sure it was distributed somewhat evenly. She then put the cap back on for an additional five minutes, per the instructions.
Because it was the first time I’d done anything hair-related that didn’t involve a blow dryer or iron, I was understandably nervous and treading lightly while closely following the instructions. I made the mistake of not adding the dye throughout the different layers of her hair and mostly colored what was visible around the four sections of hair — but in four weeks when I have to do this again, I’ll be a pro.
My mom then used the cleansing wipe to remove any bits of color from her skin. She went into the shower wearing a pair of gloves and rinsed her hair until the water was clear. She then used the color-protecting shampoo and conditioner included in the package.
The Results
I’m not saying I’m going to take up a hair-coloring side hustle, but I’m also not not saying it. My mom’s hair came out beautifully, and the fact that I was able to give her a morality boost and somewhat of an aesthetic return to normalcy after more than eight weeks since her last appointment made it all the more worth it. (Next time, though, I’m definitely requesting a tip on Venmo.)

Image Source: POPSUGAR Photography / Perri Konecky
The post Madison Reed Dye Permanent Color Kit Editor Experiment appeared first on Best Of Force Blog.
from Best Of Force Blog https://ift.tt/2xR931c
via Best Of Force On Wordpress
from Best Of Force https://ift.tt/3fzTOuN
via elihubert23 On Medium
Không có nhận xét nào:
Đăng nhận xét